Install balenaEtcher

In the following steps, you will install an intermediary Tails using the Tails USB image that you downloaded earlier.
balenaEtcher is the Free Software tool that we recommend to install Tails on USB sticks.
Instead of using balenaEtcher, you can
also install Tails using dd on the command
line.
Make sure that your USB stick is unplugged.
Open the Terminal utility from Applications ▸ Utilities.
Execute the following command.
diskutil list
It returns a list of the storage devices on the system. For example:
/dev/disk0
 #:                     TYPE NAME         SIZE      IDENTIFIER
 0:    GUID_partition_scheme             *500.1 GB  disk0
 1:                      EFI              209.7 MB  disk0s1
 2:                Apple_HFS MacDrive     250.0 GB  disk0s2
 3:                      EFI              134.1 GB  disk0s3
 4:     Microsoft Basic Data BOOTCAMP     115.5 GB  disk0s4
Plug your USB stick into the computer.
Execute again the same command.
diskutil list
Your USB stick appears as a new device in the list. Check that its size corresponds to the size of your USB stick.
/dev/disk0
 #:                     TYPE NAME         SIZE      IDENTIFIER
 0:    GUID_partition_scheme             *500.1 GB  disk0
 1:                      EFI              209.7 MB  disk0s1
 2:                Apple_HFS MacDrive     250.0 GB  disk0s2
 3:                      EFI              134.1 GB  disk0s3
 4:     Microsoft Basic Data BOOTCAMP     115.5 GB  disk0s4

/dev/disk1
 #:                     TYPE NAME         SIZE      IDENTIFIER
 0:   FDisk_partition_scheme             *8.0 GB    disk1
 1:                Apple_HFS Untitled 1   8.0 GB    disk1s1
Take note of the device name of your USB stick.
In this example, the USB stick is 8.0 GB and its device name is /dev/disk1. Yours might be different.
If you are unsure about the device name, you should stop proceeding or you risk overwriting any hard disk on the system.
Execute the following command to safely eject the USB stick. Replace device with the device name found in step 6.
diskutil unmountDisk device
Execute the following commands to copy the USB image that you downloaded earlier to the USB stick.
Replace:
tails.img with the path to the USB image
If you are unsure about the path to the USB image, you can insert the correct path by dragging and dropping the icon of the USB image from Finder onto Terminal.
device with the device name found in step 6
You can try adding
rbeforediskto make the installation faster.
dd if=tails.img of=device bs=16m && sync
You should get something like this:
dd if=/Users/me/tails-amd64-3.12.img of=/dev/rdisk9 bs=16m && sync
If no error message is returned, Tails is being copied on the USB stick. The copy takes some time, generally a few minutes.
If you get a
Permission deniederror, try addingsudoat the beginning of the command:sudo dd if=tails.img of=device bs=16m && sync
If you get an
invalid number ‘16m’error, try using16Minstead:dd if=tails.img of=device bs=16M && sync
The installation is complete when the command prompt reappears.
Click on the following button to download balenaEtcher:
Save your download to your usual Downloads folder and not to the USB stick.
Open the balenaEtcher download (DMG disk image).
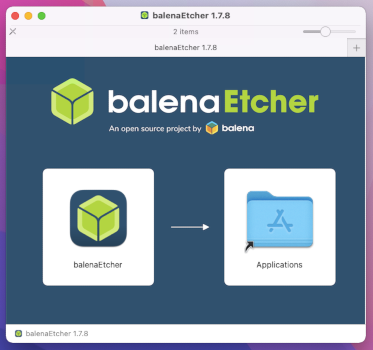
To install balenaEtcher, drag the balenaEtcher icon onto the Applications icon.
Close the installation window of balenaEtcher.
Optionally, eject the disk image of balenaEtcher from the sidebar of Finder.