Installiere balenaEtcher

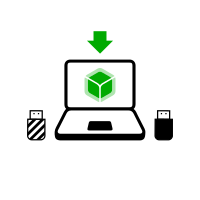
In den folgenden Schritten installieren Sie ein Tails-Zwischenprodukt unter Verwendung des Tails-USB-Images, das Sie zuvor heruntergeladen haben.
balenaEtcher is the Free Software tool that we recommend to install Tails on USB sticks.
Instead of using balenaEtcher, you can
also install Tails using dd on the command
line.
Make sure that your USB stick is unplugged.
Open the Terminal utility from Applications ▸ Utilities.
Execute the following command.
diskutil list
Es wird eine Liste der Speichermedien des Systems ausgegeben. Zum Beispiel:
/dev/disk0
 #:                     TYPE NAME         SIZE      IDENTIFIER
 0:    GUID_partition_scheme             *500.1 GB  disk0
 1:                      EFI              209.7 MB  disk0s1
 2:                Apple_HFS MacDrive     250.0 GB  disk0s2
 3:                      EFI              134.1 GB  disk0s3
 4:     Microsoft Basic Data BOOTCAMP     115.5 GB  disk0s4
Plug your USB stick into the computer.
Execute again the same command.
diskutil list
Ihr USB-Stick erscheint als neues Speichermedium in der Liste. Stellen Sie sicher, dass die Größe der Speicherkapazität Ihres USB-Sticks entspricht.
/dev/disk0
 #:                     TYPE NAME         SIZE      IDENTIFIER
 0:    GUID_partition_scheme             *500.1 GB  disk0
 1:                      EFI              209.7 MB  disk0s1
 2:                Apple_HFS MacDrive     250.0 GB  disk0s2
 3:                      EFI              134.1 GB  disk0s3
 4:     Microsoft Basic Data BOOTCAMP     115.5 GB  disk0s4

/dev/disk1
 #:                     TYPE NAME         SIZE      IDENTIFIER
 0:   FDisk_partition_scheme             *8.0 GB    disk1
 1:                Apple_HFS Untitled 1   8.0 GB    disk1s1
Take note of the device name of your USB stick.
In this example, the USB stick is 8.0 GB and its device name is /dev/disk1. Yours might be different.
Falls Sie sich bezüglich des Gerätenamens nicht sicher sind, sollten Sie das Vorgehen abbrechen oder Sie riskieren, dass jegliche Festplatten des Systems überschrieben werden.
Execute the following command to safely eject the USB stick. Replace device with the device name found in step 6.
diskutil unmountDisk device
Führen Sie die folgenden Befehle aus, um das zuvor heruntergeladene USB-Image auf den USB-Stick zu kopieren.
Ersetzen Sie:
tails.img with the path to the USB image
Falls Sie sich über den Pfad zum ISO-Image unsicher sind, können Sie den richtigen Pfad per Drag and Drop des Symbols des ISO-Abbilds vom Finder in das Terminal einfügen.
device mit dem Gerätenamen, den Sie in Schritt 6 herausgefunden haben
You can try adding
rbeforediskto make the installation faster.
dd if=tails.img of=device bs=16m && sync
Sie sollten etwas wie folgt erhalten:
dd if=/Users/me/tails-amd64-3.12.img of=/dev/rdisk9 bs=16m && sync
Wenn keine Fehlermeldung angezeigt wird, wird Tails auf den USB-Stick kopiert. Das Kopieren benötigt einige Zeit, in der Regel ein paar Minuten.
If you get a
Permission deniederror, try addingsudoat the beginning of the command:sudo dd if=tails.img of=device bs=16m && sync
If you get an
invalid number ‘16m’error, try using16Minstead:dd if=tails.img of=device bs=16M && sync
The installation is complete when the command prompt reappears.
Klicken Sie auf die folgende Schaltfläche, um balenaEtcher herunterzuladen:
Save your download to your usual Downloads folder and not to the USB stick.
Open the balenaEtcher download (DMG disk image).
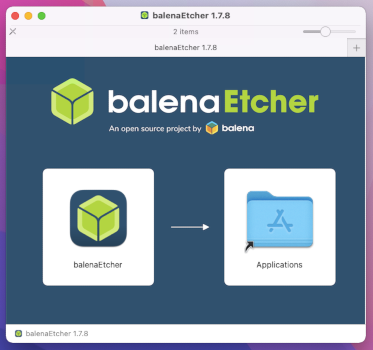
To install balenaEtcher, drag the balenaEtcher icon onto the Applications icon.
Close the installation window of balenaEtcher.
Optionally, eject the disk image of balenaEtcher from the sidebar of Finder.