Install balenaEtcher

In the following steps, you will install an intermediary Tails using the Tails USB image that you downloaded earlier.
balenaEtcher is the Free Software tool that we recommend to install Tails on USB sticks.
Instead of using balenaEtcher, you can
also install Tails using dd on the command
line.
Убедитесь, что ваша флешка не подключена.
Open the Terminal utility from Applications ▸ Utilities.
Execute the following command.
diskutil list
Вы увидите список носителей данных. Пример:
/dev/disk0
 #:                     TYPE NAME         SIZE      IDENTIFIER
 0:    GUID_partition_scheme             *500.1 GB  disk0
 1:                      EFI              209.7 MB  disk0s1
 2:                Apple_HFS MacDrive     250.0 GB  disk0s2
 3:                      EFI              134.1 GB  disk0s3
 4:     Microsoft Basic Data BOOTCAMP     115.5 GB  disk0s4
Plug your USB stick into the computer.
Execute again the same command.
diskutil list
Ваша флешка появится в списке как новое устройство. Убедитесь, что указанный объём соответствует фактическому объёму флешки.
 /dev/disk0
  #:                     TYPE NAME         SIZE      IDENTIFIER
  0:    GUID_partition_scheme             *500.1 GB  disk0
  1:                      EFI              209.7 MB  disk0s1
  2:                Apple_HFS MacDrive     250.0 GB  disk0s2
  3:                      EFI              134.1 GB  disk0s3
  4:     Microsoft Basic Data BOOTCAMP     115.5 GB  disk0s4

 /dev/disk1
  #:                     TYPE NAME         SIZE      IDENTIFIER
  0:   FDisk_partition_scheme             *8.0 GB    disk1
  1:                Apple_HFS Untitled 1   8.0 GB    disk1s1
Take note of the device name of your USB stick.
In this example, the USB stick is 8.0 GB and its device name is /dev/disk1. Yours might be different.
Если вы не уверены насчёт имени устройства, лучше прервать процесс. Иначе вы рискуете перезаписать какой-нибудь из жёстких дисков в системе.
Execute the following command to safely eject the USB stick. Replace device with the device name found in step 6.
diskutil unmountDisk device
Чтобы записать скачанный ранее образ на флешку, выполните следующие команды:
Замените:
tails.img на путь к вашему USB-образу
Если вы не уверены относительно пути к USB-образу, можете вставить правильный путь, перетащив и бросив значок USB-образа из Finder в Терминал.
device на название устройства, обнаруженное на шаге 6
You can try adding
rbeforediskto make the installation faster.
dd if=tails.img of=device bs=16m && sync
Вы увидите что-то подобное:
dd if=/Users/me/tails-amd64-3.12.img of=/dev/rdisk9 bs=16m && sync
Если нет сообщения об ошибке, значит, Tails установлен на флешку. Копирование занимает время, обычно несколько минут.
If you get a
Permission deniederror, try addingsudoat the beginning of the command:sudo dd if=tails.img of=device bs=16m && sync
If you get an
invalid number ‘16m’error, try using16Minstead:dd if=tails.img of=device bs=16M && sync
The installation is complete when the command prompt reappears.
Click on the following button to download balenaEtcher:
Save your download to your usual Downloads folder and not to the USB stick.
Open the balenaEtcher download (DMG disk image).
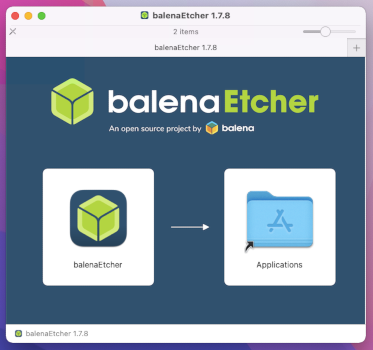
To install balenaEtcher, drag the balenaEtcher icon onto the Applications icon.
Close the installation window of balenaEtcher.
Optionally, eject the disk image of balenaEtcher from the sidebar of Finder.